Table of Contents
- What is Docker?
- How to Build a Docker Image
- How to Run a Docker Container
- Images and Containers
- Docker Commands
- Volumes and Bind Mounts
- ARGuments and ENVironment Variables
- Networks
- Docker-Compose file
- Deploying a Docker Image to an Amazon EC2 Virtual Machine
- Deploying a Docker Image to an Azure App Service (Web App)
- Deploying a Docker Image to an Azure Virtual Machine
What is Docker?
Docker is a tool for creating and managing containers. A container is an isolated standardized unit of software, which means it has the code and all the dependencies needed to run the code.
A Docker container is different from a Virtual Machine in the sense that a container runs on the same operating system as the host machine it runs into, whereas a virtual machine can have a different operating system than the one the host machine has. A virtual machine also comes with a lot of pieces of software that are not needed to run our specific app, so it has a lot of redundant duplication and waste of resources such as memory and disk space.
| Docker Containers | Virtual Machines |
|---|---|
| Low impact on Operating System (Memory, Disk space) | Big impact on Operating System (Memory, Disk space) |
| Easy to share and distribute | Difficult to share |
| Encapsulate apps | Encapsulate whole machines |
The Docker application comes with the following tools:
- Docker Engine: It Hosts Linux to run a Virtual Machine to run our containers
- Docker Desktop: Tool that makes sure the Docker Engine works and comes with a Command Line Interface
- Docker Hub: Web App to host our Docker images
- Docker Compose: To manage multi-containers
How to Build a Docker Image
A docker file has the instructions to build the image. To create one, simply create a text file named “dockerfile” without any extension and include as a minimum, the following instructions:
- FROM imagename (the image name can contain the version separated by “:”)
- WORKDIR /app (the root path of our app)
- COPY package.json /app/ (Copies the file from our local folder to the container. The first part is the “from path” and the second path is the “to path” where we want to copy the code into the container)
- RUN npm install (whatever we want to run)
- COPY . . (the first dot is the “from” and the second dot “is the “to” where we want to copy the code to)
- EXPOSE 3000 (the port we want to expose)
- CMD [“node”, “server.js”] (the code we want to execute from the command line, once the container is created)
FROM node:14
WORKDIR /app
COPY package.json /app/
RUN npm install
COPY . /app/
EXPOSE 80

CMD ["npm", "start"]
FROM python

WORKDIR /app

COPY . /app

CMD ["python", "rng.py"]
Once the docker file is ready, we just open the terminal and build the Docker Image by typing “docker build .”
Alternatively, we can add “-t” followed by a name if we want to put a name to the image for easy identification, the “:” separates the name from the version which can be a number or text.
docker build -t hector:1 .
How to Run a Docker Container
The basic command to run a docker container is:
docker run imageid
If the docker file exposes a port number we need to use “-p” to publish the container and the port number. The first number of the port is the local port used by our computer, the second number is the port used by the container
Additional parameters to run a container
| Parameter | Meaning |
|---|---|
| -p 3000:3000 | To expose a port |
| -it | To tell docker to expose an interactive pseudo terminal session to input something |
| -a | To attach to a container and listen to log messages. The default mode is to run the container in DETACH mode |
| -i | Activates the interactive mode of an app to provide input |
| -d | Run container in DETACHED mode, so that we can use terminal |
| –name containername | To name the container |
| –rm | To delete the container after it stops |
| -v /app/foldername | Creates an anonymous volume |
| -v volumename:/app/foldername | To create a “named” volume |
| -v “/path/to/my/code:/app/foldername” | To create a “Bind Mount” |
| -v “/path/to/my/code:/app/foldername:ro“ | To make the container “Ready-Only” |
| –e PORT=8000 | To use an ENVironment variable, in this case PORT=8000 |
| –env-file ./.env | To use an ENVironment file, in this case the file “.env” |
| –network favorites-net | Creates a local network to connect several containers between each other |
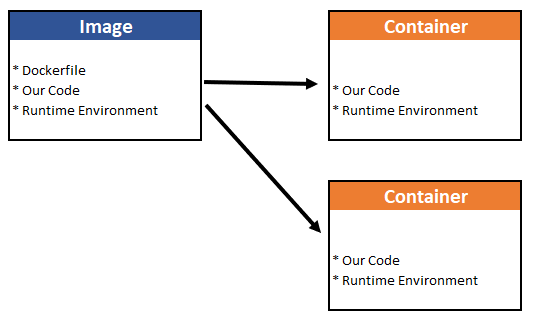
Images and Containers
We can use a pre-built image hosted on Docker Hub or create an image ourselves. From an image, we can create several independent and isolated instances of containers.
| Images | Containers |
|---|---|
| Template / Blueprint for creating containers | The isolated running unit of software that runs the code of the image |
| Contains the code and the required tools or runtimes | Multiple containers can be created based on one image |
| An image is read-only. If the source code changes, we need to rebuild the image again | |
| Images are either downloaded (docker pull) or created with a Dockerfile and running a “docker build“ | |
| Images contain multiple layers to optimize build speed (caching) |
Docker Commands
| Command | Explanation |
|---|---|
| General Commands | |
| docker –help | Hints about a command |
| docker login | Log into Docker |
| docker logout | Log out of Docker |
| Image Commands | |
| docker build . | Builds an image |
| docker images docker image ls | List of images |
| docker rmi imagename | Deletes an image name |
| docker image prune -a | Removes unused images |
| docker image inspect imageid | Analyzes an image |
| docker tag oldimagename:version newimagename:version | Renames an image |
| docker push hsanchezp/imagename:tagname | Uploads image to Docker Hub |
| docker pull hsanchezp/imagename:tagname | Pulls the latest image from Docker Hub |
| Container Commands | |
| docker run imageid:tagname | Creates and runs a container |
| docker ps | To see a list of containers running |
| docker ps -a | Lists all containers, even the ones that are stopped |
| docker stop containername | Stops a running container |
| docker start containername | Restarts a container after being stopped |
| docker attach containername | To attach a container to listen to log messages |
| docker logs containername | To see log messages of a running container |
| docker rm containername | Deletes a container |
| docker container prune | Deletes unused containers |
| docker cp sourcefile.txt containername:/test | To copy a file from our local directory on our computer to a folder in a container |
| docker exec containername commandname | Executes a command inside of a running container besides the default command the container executes |
| Volume Commands | |
| docker volume ls | To see lists of volumes (does not include bind mounts) |
| docker volume create volumename | Creates a volume |
| docker volume inspect volumename | Analyzes a volume |
| docker volume rm volumename | Removes a volume |
| docker volume prune | Removes unused volumes |
| Network Commands | |
| docker network create networkname | Creates a Network of containers |
| docker network ls | To see list of networks |
| docker network create –driver bridge networkname | The drivers can be: * bridge (default) * host (for stand-alone containers) * overlay (multiple docker daemons) |
| docker rm networkname | Removes a network |
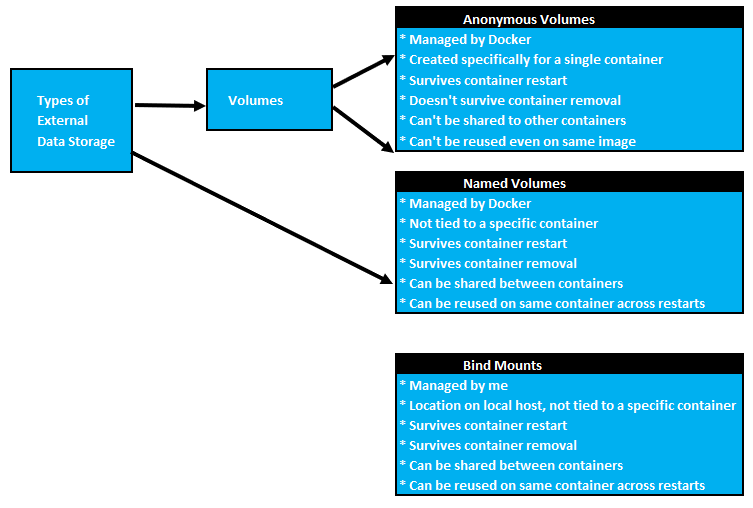
Volumes and Bind Mounts
Volumes are folders on our host machine hard drive which are mounted into containers. Volumes allow us to persist data, even if the container gets shut down. If a container restarts and mounts a volume, any data inside the volume is available to the container.
“Bind Mounts” are used with permanent data just like volumes, but the difference is that these are managed by us and we know where they are located. We define a path on our local machine and map it to a location in the container, thus allowing us to make LIVE changes locally and making them available without having to rebuild the image.
Note: We shouldn’t use Bind Mounts in Production
- Parameter to create an Anonymous Volume: -v /app/foldername
- Parameter to create a Named Volume: -v volumename:/app/foldername
- Parameter to create a “Bind Mount”: -v “/path/to/my/code:/app/foldername”
Because of the way Docker behaves, it is recommended to add an anonymous volume for the runtime folders like “NodeJS”, here is an example with the usage of 2 types of volumes and bind mount:
docker run -d --rm -p 3000:80 --name feedback-app -v feedback:/app/feedback -v "C:\Users\hecto\Downloads\Docker Course\data-volumes-01-starting-setup:/app:ro" -v /app/temp -v /app/node_modules feedback-node:volumes
- Named Volume: -v feedback:/app/feedback
- Bind Mount: -v “C:\Users\hecto\Downloads\Docker Course\data-volumes-01-starting-setup:/app:ro”
- Anonymous Volume for Temp Folder: -v /app/temp
- Anonymous Volume for NodeJS: -v /app/node_modules
Note: It is a good practice set the “Bind Mount” as “read-only”, as the default behavior of containers is “read-write”
.dockerignore file
Similar to .gitigonere, the .dockerignore file is a folder where can list the files or folders that we don’t want to be included in the image when it gets built
The following are the types of data managed by a container app, volumes and bind mounts help us with Permanent App Data:
| Image Application (Code + Environment) | Container Temporary App Data | Volume Permanent App Data |
|---|---|---|
| Written by the developer | Data is produced when running the container | Data is produced when running the container |
| Code is added to an image during the build phase | Data is stored in memory or in temporary files | Data is stored in files or a database |
| “Fixed”, which means it can’t be changed once the image is built | “Dynamic”, which means that changes, but it is cleared regularly | Data persists after the container is stopped or removed |
| READ-ONLY, stored in IMAGES | READ+WRITE, stored in CONTAINERS | READ+WRITE, stored in CONTAINERS in VOLUMES and BIND MOUNTS |
ARGuments and ENVironment Variables
Docker supports build-time ARGuments and runtime ENVironment variables.
ARGuments allow us to set flexible bits of data in our dockerfile which we can use to plug certain values in the dockerfile, provided by the build command. ARGuments are available inside the Dockerfile, not accessible in CMD or any application code
ENVironnents are also available inside the dockerfile but also in the application code. We can set them using the parameter –env on docker run of the container.
The advantage of using ENV and ARG is that we can pass parameters to the dockerfile without having to rebuild the image
FROM node:14
WORKDIR /app
COPY package.json /app/
RUN npm install
COPY . /app/

# ARGUMENT VARIABLE
ARG DEFAULT_PORT=80

# ENVIRONMENT VARIABLE
ENV PORT $DEFAULT_PORT
EXPOSE $PORT

VOLUME [ "/temp" ]
CMD ["npm", "start"]
- Example of use of an ENV: –e PORT=8000
docker run -d --rm -p 3000:8000 --e PORT=8000 --name feedback-app -v feedback:/app/feedback -v "C:\Users\hecto\Downloads\Docker Course\data-volumes-01-starting-setup:/app:ro" -v /app/temp -v /app/node_modules feedback-node:env
- Example of use of an ENV in a file in our local files: –env-file ./.env
docker run -d --rm -p 3000:8000 --env-file ./.env --name feedback-app -v feedback:/app/feedback -v "C:\Users\hecto\Downloads\Docker Course\data-volumes-01-starting-setup:/app:ro" -v /app/temp -v /app/node_modules feedback-node:env
- Example of use of an ARG: –build-arg DEFAULT_PORT=8000
docker build -t feedback-node:dev --build-arg DEFAULT_PORT=8000 .
Networks
Connecting the Container to the Internet
Docker containers can connect right out of the box to the Internet, so there is no need for any special setup, just use regular http requests (ie: https://cfocoder.com)
Connecting the Container to the Local Host
When trying to connect to the Local Host (http://localhost:27017), just replace localhost with “host.docker.internal” like this: http://host.docker.internal:27017
Connecting the Container to Another Container
.1. Create the network first
docker network create networkname
2. When connecting to the network, replace “localhost” or “host.docker.internal” with the name of the container we want to connect to like this: http://containername:27017
3. When running the container, add the network parameter “–network networkname”. For the container we want to connect to, it is not necessary to publish the port number as Docker resolves this automatically, we only need to publish a port number for the container that is connecting to the other. The only requirement is that the containers we want to connect to are located in the same network.
# CONTAINER WE ARE CONNECTING TO (NO NEED TO PUBLISH A PORT)
docker run --name mongodb --network favorites-network -d --rm mongo

# CONNECTING CONTAINER ( WE NEED TO PUBLISH A PORT)
docker run --name favorites-app --network favorites-network -d --rm -p 3000:3000 favorites-node
Docker-Compose file
This is a text file in YAML format, that help us configure one or several containers from a single file, instead of typing all the parameters from the terminal when running each individual container. The name of the file is “docker-compose.yaml”
Docker-Compose is not suite for managing multiple containers on different hosts or machines, but it is great for managing containers in the sample host.
Here is an example of a “docker-compose.yaml” file:
- Although it is not necessary to specify a network, it is best to setup one to avoid issues
- Volumes and Networks are setup at the end, at the same level as the “services” tag.
- Add the keys “stdin_open: true” and “tty: true” to run the container in interactive mode, it is the equivalent of the tag “-it” when running the container from terminal
version: '3.8'
services:
  mongodb:
    container_name: mongodb
    image: mongo
    volumes:
      - mongovolume:/data/db
    environment:
      MONGO_INITDB_ROOT_USERNAME: myusername
      MONGO_INITDB_ROOT_PASSWORD: mypassword
    # environment file
    #   - ./env/mong.env
    networks:
      - goals-network

  backend:
    container_name: goals-backend
    build: ./backend
    volumes:
      - logs:/app/logs
      - ./backend:/app
      - /app/node_modules
    environment:
      MONGODB_USERNAME: myusername
      MONGODB_PASSWORD: mypassword
    ports:
      - 80:80
    networks:
      - goals-network
    depends_on:
      - mongodb

  frontend:
    container_name: goals-frontend
    build: ./frontend
    volumes:
      - ./frontend/src:/app/src
    # env_file:
    #  - ./env/backend.env
    ports:
      - 3000:3000
    networks:
      - goals-network
    stdin_open: true
    tty: true
    depends_on:
      - backend

volumes:
  mongovolume:
    name: mongovolume
  logs:
    name: logsvolume

networks:
  goals-network:
    name: goals-network
Alternative to Building an Image
When the Dockerfile is inside a folder, an alternative for building an image from a docker-compose.yaml file is as below. Basically, after the “build” tag, we need to specify the context, relative to the location of the docker-compose.yaml file, and then put the location of the DockerFile:
    build:
      context: .
      dockerfile: dockerfiles/nginx.dockerfile
Overriding Dockerfile commands from docker-compose.yaml file
It is possible to run commands that we typically use inside the Dockerfile from the docker-compose.yaml file by specifying it like this example for “working_dir” and “entrypoint”:
  npm:
    image: node:14
    working_dir: /var/www/html
    entrypoint: ["npm"]
    volumes:
      - ./src:/var/www/html
Docker Compose Commands
| Command | Explanation |
|---|---|
| docker-compose up -d | builds and runs container in detached mode (by default it runs in attached mode) |
| docker-compose up –build | forces the images to be rebuilt when running the container |
| docker-compose run –rm servicename commandname | Allows us to run a single service from the docker-compose file + any command after the entry point setup in the dockerfile |
| docker-compose build | builds the images without starting the container |
| docker-compose down -v | removes containers, networks and volumes, except images. |
Utility Containers
Utility Containers are containers that only have an environment setup in them, with the purspose of temporarily running commands in the environment without having to install it in our local computer. They are easy to setup and uninstall.
In the docker-compose.yaml file, we setup a “bind mount” volume, so that the files in the container, get synced with the files in our local folder (./:/app)
The steps to setup a utility container are:
- From an empty folder in our computer, a DockerFile with the details of the environment we want to test, and also create a docker-compose.yaml file
- Then run the container using a command like this: docker-compose run –rm servicename commandname
- The Dockerfile has the tag “ENTRYPOINT” so that when we run the container, any command we ask it to execute, appends it after whatever value is set in this tag, in the case of the example, the command “init”, so this is the equivalent of executing “npm init”
Below are examples of the DockerFile, docker-compose.yaml and the command used to run the “init” command in NODE.JS
FROM node:14-alpine

WORKDIR /app

ENTRYPOINT ["npm"]
version: '3.8'
services:
  mynode:
    build: ./
    stdin_open: true
    tty: true
    volummes:
      - ./:/app
docker-compose run mynode init
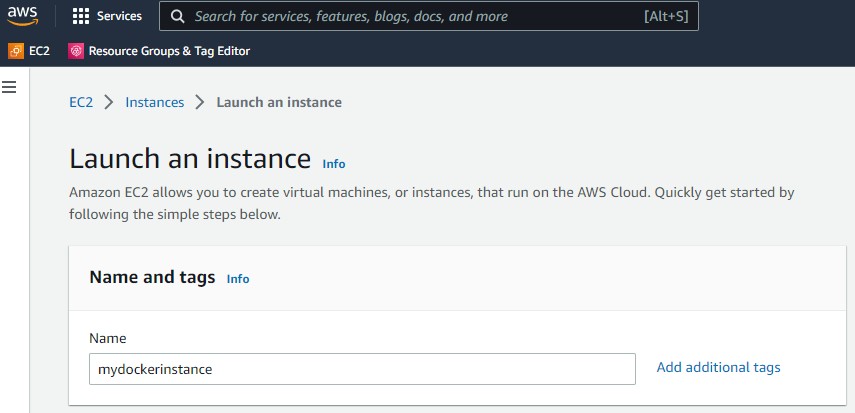
Deploying a Docker Image to an Amazon EC2 Virtual Machine
1.- Go to Docker Hub and create a repository
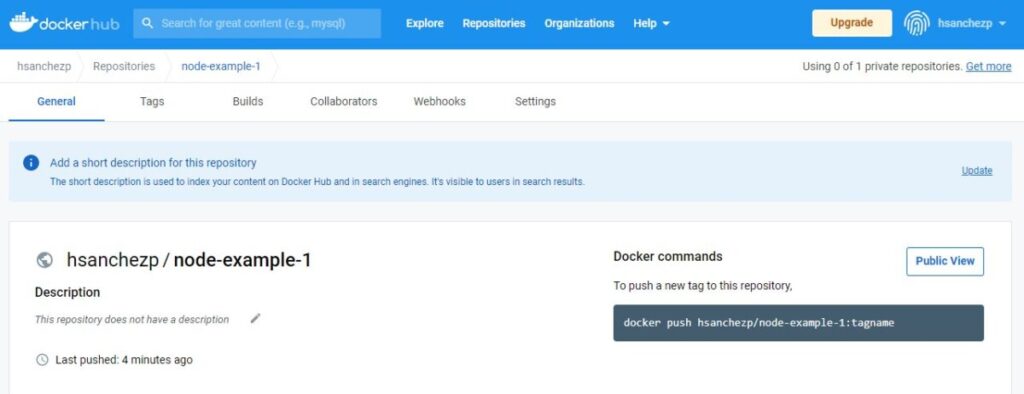
2.- Build the Docker Image in our local machine, using the path of the repository as the name of the image, in the case of the example above, the name would be “hsanchezp/node-example-1“
docker build -t hsanchezp/node-example-1 .
3.- Push local Docker Image to Docker Hub, again using the name as in the path in Docker Hub, in this case “hsanchezp/node-example-1“
docker push hsanchezp/node-example-1
3.- Go to the Amazon AWS Console and create an EC2 Virtual Machine. Choose a “t2.micro” instance as it is free, and also create a “Key pair login” specific for the instance and also tick the options for allowing HTTP and HTTPS traffic from the internet.
When creating the “Key pair login”, we are going to have to download a PEM file, which is the key to later connect to the EC2 Virtual Machine from our local computer in PowerShell, so make sure to save the PEM file inside the project folder in our local computer.
Also, make sure to change the permissions to the PEM file following the instructions in this blog post, otherwise, we won’t be able to connect to the EC2 instance from PowerShell.
Once the permissions of the PEM file have been changed, connect to the EC2 Instance from PowerShell
4.- Update the EC2 Instance
sudo yum update -y
5.- Install Docker on the Amazon EC2 Instance
sudo amazon-linux-extras install docker
6.- Start Docker Service in the EC2 Instance
sudo service docker start
7.- Run Docker Hub Image from Amazon EC2. Make sure to use the full path name of the image
sudo docker run -d --rm -p 80:80 hsanchezp/node-example-1
Deploying a Docker Image to an Azure App Service (Web App)
This is the preferred method as Azure Web Apps have a FREE Tier we can use, and the deployment is very fast:
1 – 3: Follow the same first 3 steps as the previous guide for deploying a docker image to an Amazon EC2 Virtual Machine
4.- Go to https://portal.azure.com/ and create a Resource Group
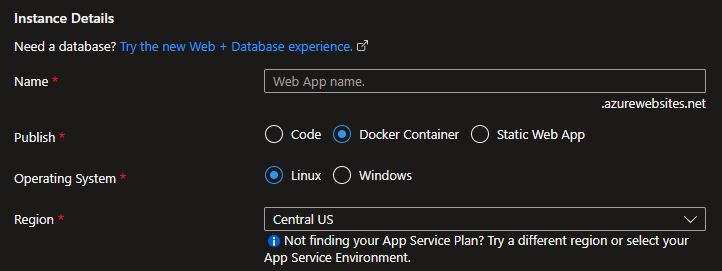
5.- Create a Web App inside the Resource Group we just created. Tick the option “Docker container” under the “Publish Section”
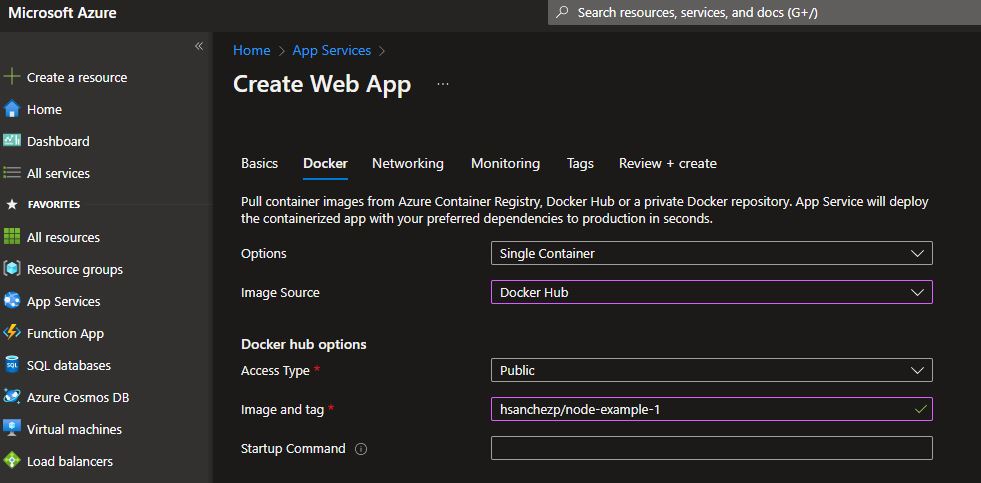
6.- In the Docker Section, select “Docker Hub” in the”Image Source” section, and type the image name and tag per Docker Hub under the “Image and tag” section
Deploying a Docker Image to an Azure Virtual Machine
Deploying a Docker Image to an Azure Virtual Machine is very similar to the deployment to an Amazon EC2 Virtual Machine:
1 – 3: Follow the same 3 steps as the previous guide for deploying a docker image to an Amazon EC2 Virtual Machine
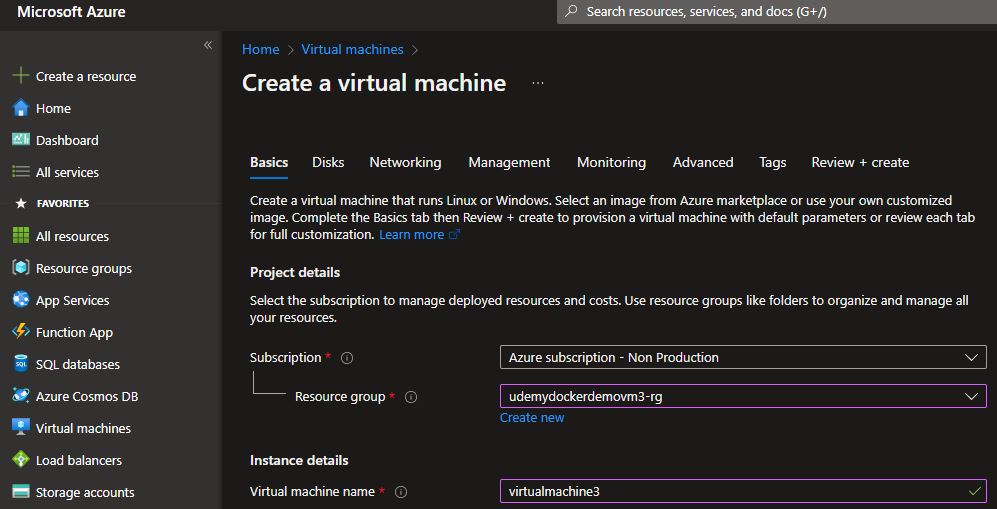
4.- Go to https://portal.azure.com/ and create a Resource Group
5.- Create a Virtual Machine inside the Resource Group we just created. Select “Ubuntu Server”
6.- Once the Virtual Machine has been created, connect to it from our local terminal, and update the Azure Virtual Machine Instance
sudo apt-get update && sudo apt-get upgrade
7.- Install the Docker Engine following the official instructions at Docker
8.- Start Docker Service in the Azure Virtual Machine Instance
sudo service docker start
9.- Run Docker the Hub Image from the Azure Virtual Machine. Make sure to use the full path name of the image
sudo docker run -d --rm -p 80:80 hsanchezp/node-example-1