As part of the Data Science course I’m currently studying in Tec de Monterrey, I learned how to do remote python development using Github Codespaces for free. I found this to be an eye-opener as it meant I could use Visual Studio Code for coding Python apps directly on a Linux remote server for free. The issue was that I quickly run out of free credits to finish my school projects, so I decided to replicate Github Codespaces on a cheap Azure Virtual Machine which only costs just a few cents per hour and I have a lot more flexibility for scaling the VM up or down if I want.
Table of Contents
- Setup the Azure Virtual Machine
- Setup the SSH Key
- Setup Remote SSH with Visual Studio Code
- Install Anaconda
- Setup GitHub
- Install Python dependencies
- Install asdf Version Manager
- Install Pipenv
- Install NetStat
- Limit SSH access to Port 22
Setup the Azure Virtual Machine
I chose Azure because I really like the control I have of all resources through “Resource Groups”, and this allows me to rapidly see how much these resources are costing me. I tried to do the same with AWS and Google Cloud Platform and I found the organization and cost of resources to be less clear.
I settled with the “B2S” machine which costs about 4 cents per hour and it has 2 CPUs and 4GB of RAM memory, and a standard SSD of 30GB. I found that it runs very smoothly compared to the VM from Github Codespaces, it feels like I’m working on my own laptop.

Setup the SSH Key
I selected the option of connecting to the VM with an “SSH public key”, and when we are about to create the VM, Azure prompts us to download the .pem file with the key.
This .pem key needs to have read-only access which we can do with the CHMOD command:
chmod 400 <keyname>.pem
The code above only works on a Linux machine, and since I have a Windows laptop, I need to set the read-only access in PowerShell with the following steps:
# Set the path of the file to change permissions into
$path = ".\awskeypair.pem"
# Reset to remove explicit permissions
icacls.exe $path /reset
# Give current user explicit read-permission
icacls.exe $path /GRANT:R "$($env:USERNAME):(R)"
# Disable inheritance and remove inherited permissions
icacls.exe $path /inheritance:r
Setup Remote SSH with Visual Studio Code
Now is time to connect to the virtual machine via Visual Studio Code. Click on “Remote Explorer” from the vertical bar on the left of the screen, and then on the ‘+’ sign on the “Remote Explorer” window and finally type the IP address of the VM preceded by the username and the “@” symbol
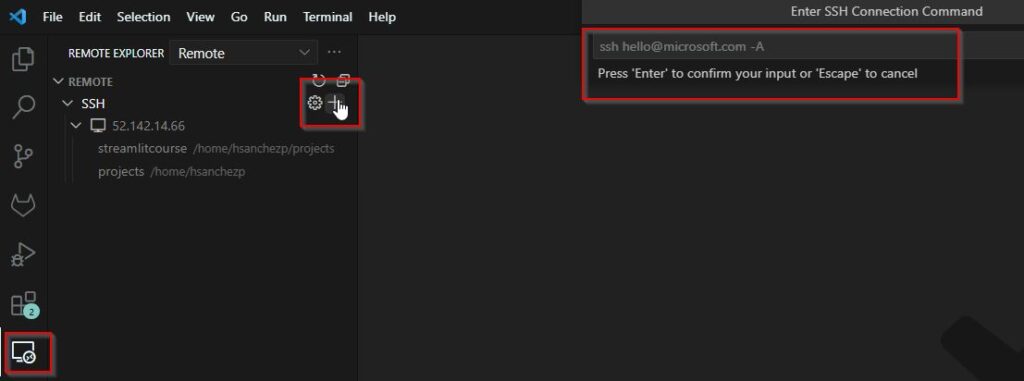
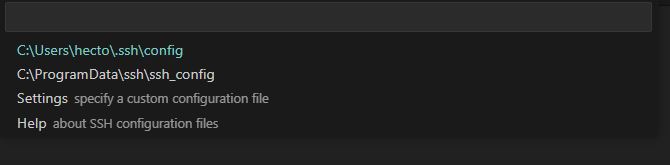
After typing the username and IP address, it will ask us for the location of the configuration file, in this case, I selected the first option as this is the place where I put the .pem key, and click on the option to open the config file so that it adds the IP address to the config file.
Once the config file is open, we’ll see that the IP address of the new VM is already there, but it is missing the path of the .pem key file. We need to manually type this path in the config file like this:
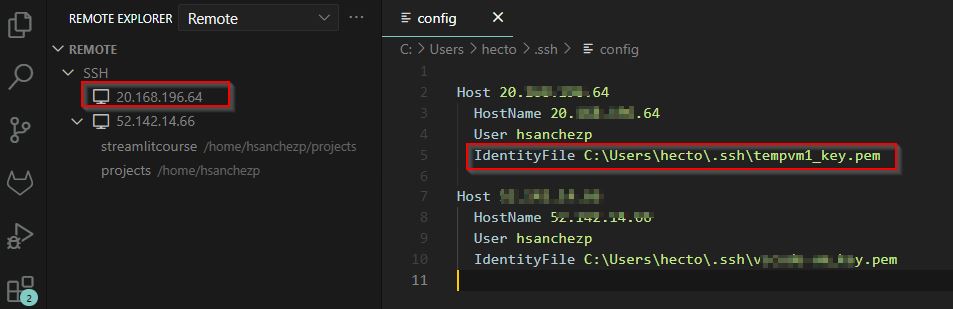
Finally, after adding the path of the .pem key file, click on the new VM from the panel on the left, and we will now be connected to the VM from VSCode.
Install Anaconda
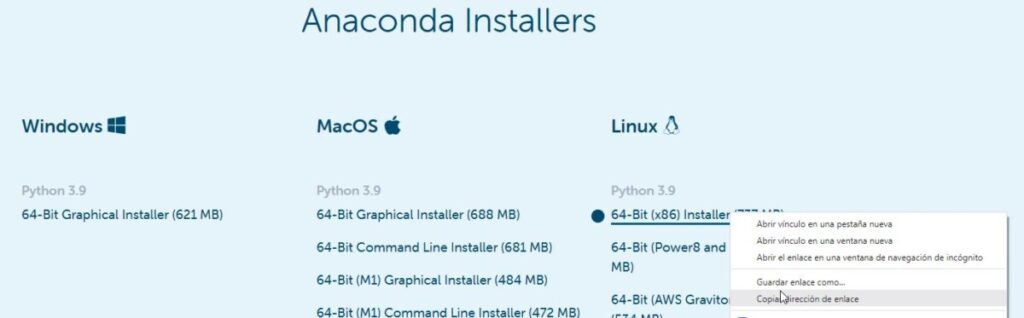
From the web page of Anaconda, get the link of the Linux installer:
Then open a new terminal in the VM from VSCode and type the following command:
wget -O aconda.sh https://repo.anaconda.com/archive/Anaconda3-2022.10-Linux-x86_64.sh
aconda.sh is the name that we will give to the Anaconda distribution that we will download from Anaconda into our VM. Once the file finishes downloading, then install Anaconda with the following command from the terminal:
bash aconda.sh
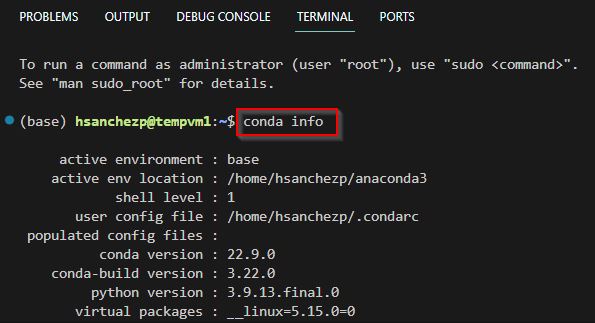
After Conda has finished the installation process, open a new terminal and type “conda info” and if we see information related to Anaconda, it means it was installed successfully
Setup GitHub
Azure VMs already come with Github preinstalled, so we just need to setup Github’s username and email:
git config --global user.name "Hector Sanchez"
git config --global user.email "[email protected]"
Install Python dependencies
Build-essential is a tool that installs a lot of packages that are required to create a Debian package (deb), and among these packages, is GCC (GNU Compiler Collection), which is a tool needed for compiling C and C++ programs.
sudo apt update
sudo apt upgrade
sudo apt install build-essential
sudo apt install libssl-dev libnss3-dev libgdbm-dev libffi-dev libncurses5-dev zlib1g zlib1g-dev libreadline-dev libbz2-dev libsqlite3-dev make gcc wget liblzma-dev
Install asdf Version Manager
asdf is a version manager and it is useful for Python Development for managing different versions of Python among other types of software packages, so we start by downloading asdf with the git clone command:
git clone https://github.com/asdf-vm/asdf.git ~/.asdf --branch v0.10.2
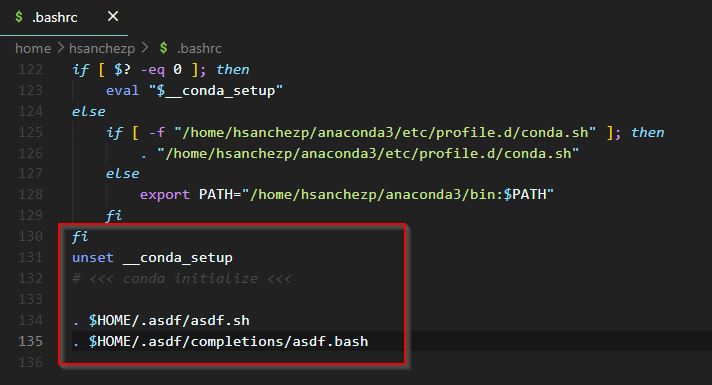
Then we need to add a couple of lines at the end of the .bashrc file.
. $HOME/.asdf/asdf.sh
. $HOME/.asdf/completions/asdf.bash
code ~/.bashrc
After adding these lines to the .bashrc file, we need to update our running shell by running this code:
. ~/.bashrc
From terminal if we type “asdf” followed by 3 tabs, we will see the list of commands that asdf can run:

We then add Python’s asdf plugin with the following code:
asdf plugin add python
To see all the versions of Python that we can install with asdf, we type the following command:
asdf list-all python
And to install a specific version of Python, we type this code:
asdf install python 3.10.4
To make the asdf Python version available globally or to the current terminal we type one of these two code lines:
asdf global python 3.10.4
asdf shell python 3.10.4
This video does a great job of setting up asdf in more detail
Install Pipenv
Pipenv is a tool that automatically creates and manages virtual environments for Python projects. It gets installed as any other Python package with PIP
pip3 install --user pipenv
After installing Pipenv, it is possible to get an error like this:
WARNING: The scripts pipenv and pipenv-resolver are installed in ‘/home/hsanchezp/.local/bin’ which is not on PATH. Consider adding this directory to PATH or, if you prefer to suppress this warning, use –no-warn-script-location.
If this is the case, then we need to add the directory to the PATH by editing each of these three files like this:
code ~/.bash-profile
code /etc/profile
code ~/.profile
And then, on each one of these files, we need to add the directory to the PATH at the very end of these files like this:
export PATH="/home/hsanchezp/.local/bin:$PATH"
I found this post very useful in explaining the setup of PATHs in Linux
Install NetStat
Netstat is a command line tool that displays active network connections, routing tables, and other network interface information. It can be used to troubleshoot your computer or server or to identify security threats. We can install it with the following command.
sudo apt install net-tools
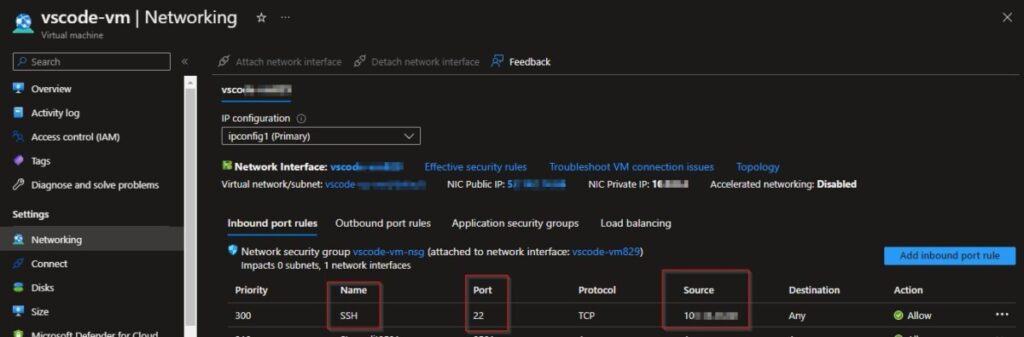
Limit SSH access to Port 22
By default, Azure VMs come with open access to Port 22, so this means that anybody could potentially enter our VM, so to prevent this, from the Networking section, add your own IP so that only you can access the VM from your location.